
There’s something addicting about flushing a golf shot—when you don’t even feel the strike, but the ball floats on air right at your target. For me, the best way to chase that feeling is by heading to Golf Lab CT in Fairfield before work, putting on some beats, and getting lost in the rhythm of crisp iron shots. It’s become a routine: music, TrackMan, and swing after swing of fine-tuning until I hit that perfect sound and feel. But to do it consistently, you can’t just guess. You need data. That’s where TrackMan’s Optimizer View becomes your best friend. With the right feedback, you can work smarter—not harder—and dial in the variables that truly affect contact, distance, and accuracy.
Enter the best iron-specific golf acronym ever: “Lazy Alligators Don’t Spin, Smash Balls Fast & Carry!”
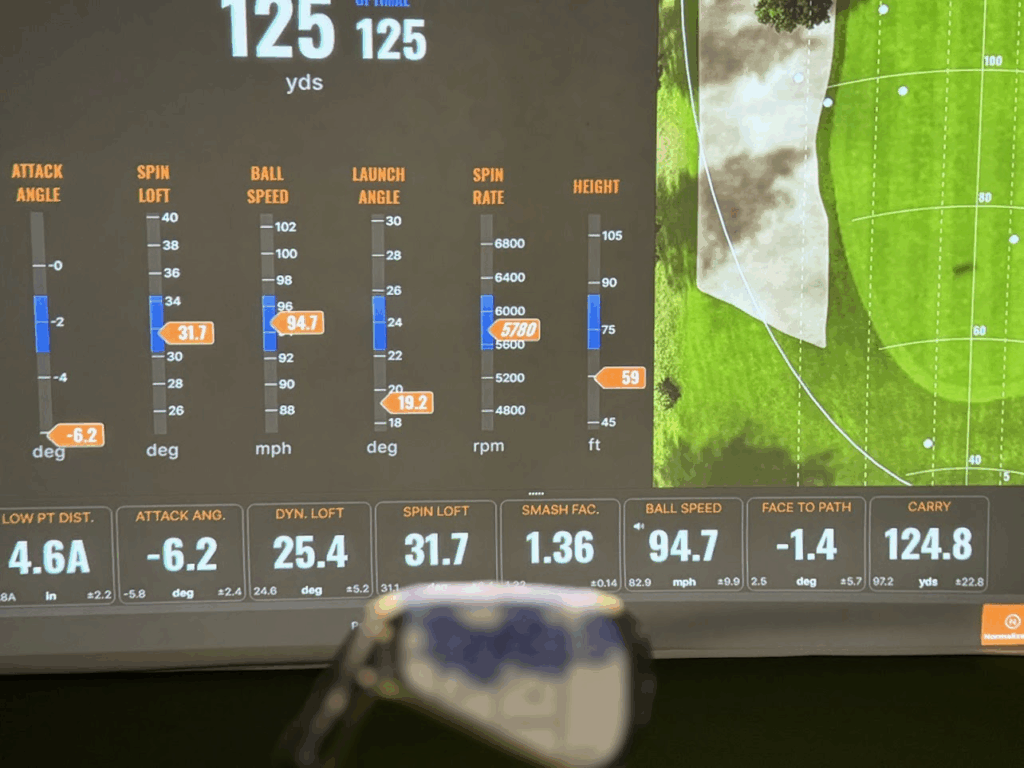
Each letter stands for a key metric in TrackMan’s Optimizer that, when tuned together, will help you strike the ball flush, maximize carry, and keep your aim true. Here are the eight metrics you need to master:
Summary Table of Flushing Metrics
| Acronym | Metric & Description |
|---|---|
| Lazy (L) | Low Point Distance: Measures how far in front of or behind the ball your swing bottoms out. Essential for crisp, ball-first contact. |
| Alligators (A) | Attack Angle: Shows if you’re hitting up or down at the ball. Controls turf interaction and shot compression. |
| Don’t (D) | Dynamic Loft: Indicates how much loft is delivered at impact. Affects launch height, spin, and trajectory control. |
| Spin (S) | Spin Loft: Difference between Attack Angle and Dynamic Loft. Determines spin rate and ball compression. |
| Smash (S) | Smash Factor: Ratio of Ball Speed to Club Speed. Reflects strike efficiency and centeredness of contact. |
| Balls (B) | Ball Speed: Speed of the ball after impact. Tied to contact quality, clubhead speed, and face control. |
| Fast (F) | Face-to-Path: Difference between clubface and swing path direction. Major influence on ball flight curvature. |
| Carry (C) | Carry Distance: Distance ball travels through the air. Final proof of whether your strike and mechanics are working together effectively. |
Understanding the Core Metrics
Before we break down each individual part of the acronym, it’s important to understand how they fit together. These eight metrics represent different but overlapping domains of swing and ball data—from how you deliver the club to how the ball responds. Think of them as puzzle pieces: the more of them you fit into place, the closer you get to that pure, effortless shot. With that in mind, let’s dive into each one.
L = Low Point Distance
Low Point is the lowest part of your swing arc relative to the ball. This is the foundational metric. When your low point is consistently 5–10 cm ahead of the ball, you’re striking it ball-first, compressing it properly, and then taking turf. It’s so crucial that I’ve set TrackMan to speak this number out loud after each swing. If your low point is behind the ball, you’re likely hitting fat shots or blading them thin. Too far forward can make the strike too steep, risking a dig. Consistently forward low point leads to ball-first, turf-second contact—the holy grail for iron play.
A = Attack Angle
Attack Angle tells you if your club is traveling up or down at impact. With irons and wedges, you want a negative angle between -3° to -6°. A shallow negative angle allows for clean, compressive contact. Too shallow, and you may catch it thin or top it. Too steep and you risk digging into the turf. This number reflects your body tilt, shaft lean, and swing arc all working in sync.
D = Dynamic Loft
Dynamic Loft is the amount of loft presented at impact, based on your shaft angle and hand position. For a 7-iron, it should typically be between 20° and 25°. Higher than this usually means you’re flipping the wrists or adding loft, resulting in weak high shots. Too low, and you’re likely delofting excessively, which can lead to low bullets with less control. Dynamic loft helps explain why two shots with the same club speed can fly completely differently.
S = Spin Loft
Spin Loft is calculated by subtracting Attack Angle from Dynamic Loft. For mid-irons, the ideal range is 10° to 15°. Too much spin loft, and you’re not compressing the ball well, leading to glancing strikes and high spin. Too little spin loft may reduce control and cause unpredictable flight. It’s one of the most insightful numbers for gauging how effectively you’re squeezing the ball.
S = Smash Factor
Smash Factor measures how efficiently you transfer energy to the ball. It’s the Ball Speed divided by Club Speed. For a well-struck 7-iron, a Smash Factor of 1.30 to 1.35 is excellent. If it’s lower, your contact is probably off-center. A high smash means solid compression, centered face contact, and great energy transfer.
B = Ball Speed
Ball Speed is how fast the ball is traveling immediately after impact. For a 7-iron, expect values around 110–125 mph. Lower than that? You’re losing speed due to inefficient strike or slow swing. Higher than that? You’re compressing the ball well with good energy transfer. It’s a direct reflection of how well everything came together at impact.

F = Face-to-Path
Face-to-Path tells you how open or closed your clubface is relative to the swing path. The goal is a number close to 0° to ±2° for neutral, straight shots. A higher positive number creates slices; a high negative produces hooks. Even with great contact, poor face-to-path leads to directional misses. Combine this number with strike location to truly understand your shot shape.
C = Carry Distance
Carry Distance is how far the ball travels in the air. For a 7-iron, typical carry is around 140–160 yards. Shorter carry may point to weak contact, excess loft, or low ball speed. Longer carry usually indicates optimal delivery. It’s the outcome of all the above metrics working in unison.
Final Word
If you’re serious about flushing your irons consistently, mastering the key TrackMan metrics is the fastest way to get there. “Lazy Alligators Don’t Spin, Smash Balls Fast & Carry!” isn’t just a fun acronym—it’s a complete roadmap to understanding strike quality, energy transfer, and launch dynamics.
At Golf Lab CT, I rely on these metrics to keep my sessions focused. But even when I’m not in the TrackMan studio, I always fall back on one number: Ball Speed. It’s the ultimate outdoor feedback tool. When I’m at the Toptracer range at H. Smith Richardson in Fairfield, I use Ball Speed to gauge how solid my contact really is. Lower than expected? I know I missed the center or added loft. Higher than usual? That’s the flush feeling confirmed. In the video below with Bryson DeChambeau and Grant Horvath, you can see that that is the sole metric that they focus on.
So whether you’re training inside or out, pay attention to the numbers that tell the full story of your strike. Start with Low Point, Attack Angle, and Smash Factor—but never ignore how far and fast that ball is flying. Your scorecard—and your swing—will thank you.

David is an avid golfer who loves walking Connecticut’s courses and playing alongside his family. He’s passionate about golf course architecture and one day hopes to play at Pebble Beach.